Cable management is the most underrated upgrade you can make to your desk setup. You can have the best monitor, the best keyboard, and the most expensive chair on the market, and your workspace will still look chaotic if cables are dangling everywhere. The flip side is equally true: even a modest setup looks intentional and professional when the cables are properly managed.
This guide covers every cable management method we have tested, from budget-friendly velcro ties to premium magnetic channels, so you can choose the approach that fits your setup and your budget.
Why Most Cable Management Fails#
The reason most people give up on cable management is that they try to do it once and expect it to last forever. In reality, your setup evolves. You add new peripherals, swap monitors, or move your desk. Permanent solutions like zip ties and adhesive clips become obstacles when you need to make changes.
The best cable management systems are designed for change. They let you add, remove, and reroute cables without tearing everything apart and starting over.
Method 1: The Under-Desk Cable Tray#
An under-desk cable tray is the single most effective cable management tool. It mounts beneath your desk and holds your power strip, adapters, and excess cable length completely out of sight. For most users, a cable tray alone solves 70 to 80 percent of the cable mess.
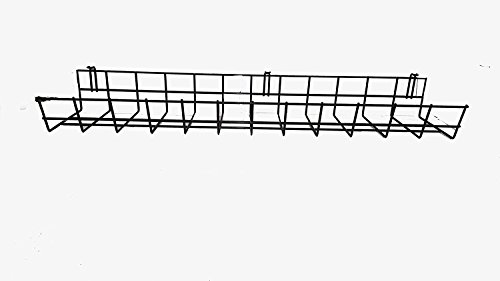
Cable Matters Under-Desk Cable Tray
Editor’s ChoiceThe Cable Matters Under-Desk Cable Tray is the best single cable management upgrade — a steel mesh tray that mounts beneath any desk to completely hide surge protectors, cables, and adapters.
The Cable Matters Under-Desk Cable Tray uses a steel mesh construction that is rigid enough to hold a full surge protector and six or more cables. The open mesh allows airflow to prevent your adapters and power bricks from overheating, which is a problem with enclosed cable boxes. You can mount it with adhesive for tool-free installation or with screws for a permanent hold.
Pro tip: Mount the tray as close to the back edge of your desk as possible. This keeps the tray hidden from view when you are seated, even if you glance under the desk.
Method 2: Cable Sleeves for Vertical Runs#
The cable tray handles everything under the desk, but you still need a solution for the cables running from the desk down to the floor or wall outlet. A cable sleeve bundles multiple cables into a single clean run that looks intentional rather than tangled.
The JOTO Cable Management Sleeve is our top pick because of its zip-along opening. Unlike split-loom tubing that requires threading cables through from one end, the JOTO sleeve opens along its entire length so you can add or remove cables at any point. This makes future changes painless.
Method 3: Velcro Ties for Bundling#
For the individual cable runs that do not fit into a tray or sleeve, velcro cable ties are the best fastening option. They are reusable, gentle on cable jackets, and infinitely repositionable.
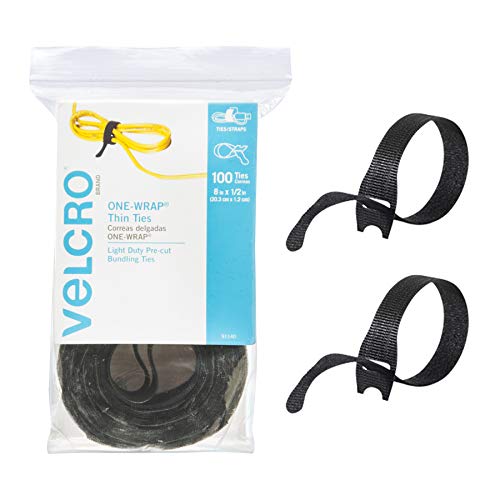
VELCRO Brand Cable Ties
VELCRO Cable Ties are the most versatile cable management tool — reusable, repositionable, and gentle on cables, they eliminate zip tie damage and make future rewiring effortless.
Use velcro ties to bundle cables behind your monitor arm, along the desk leg, or anywhere you need to group two or three cables together. A 25-pack is enough for a complete desk overhaul with ties to spare.
Why not zip ties? Zip ties are cheaper and hold tighter, but they are single-use. Every time you need to change your setup, you have to cut them off and replace them. Over time, zip ties can also dig into cable insulation and cause damage. Velcro ties avoid both problems.
Method 4: Cable Boxes for Power Strips#
If your power strip sits on the floor rather than under the desk, a cable box conceals it completely. The Bluelounge CableBox is the most stylish option, with a ventilated lid that prevents heat buildup.
Cable boxes work best for setups where the power strip cannot be relocated under the desk, either because the desk is too low, the tray cannot support the weight, or the power strip is simply too large. The fixed cable entry ports on the CableBox do limit positioning flexibility, so measure your layout before purchasing.
The Complete Cable Management Workflow#
Here is the step-by-step process we use to cable-manage every setup we build:
- Unplug everything. Remove every cable from your desk and peripherals. This gives you a clean starting point.
- Install the under-desk tray. Mount it first because it determines where your power strip and adapters will live.
- Route power cables first. Run your surge protector into the tray, then plug in your power bricks and chargers. Coil excess cable length inside the tray.
- Run desk-to-floor cables through a sleeve. Bundle the power cable and any other floor-running cables into a single sleeve.
- Connect peripherals and bundle with velcro ties. Plug in your monitor, dock, and other desk-top devices. Use velcro ties to group cables that run along the same path.
- Test everything before finalizing. Power on every device and confirm all connections work before tightening your cable management.
Maintaining Your Cable Management#
Cable management is not a one-time event. Every time you add or change a device, take five minutes to integrate the new cable into your existing system. If you skip this step, cables accumulate outside the management system and your desk slowly returns to chaos.
Keep a few spare velcro ties in your desk drawer for quick additions. And once a quarter, take 15 minutes to audit your cable runs and remove any cables for devices you no longer use. Dead cables are the silent enemy of clean cable management.
Budget vs. Premium: What to Spend#
A complete cable management kit — tray, sleeve, and velcro ties — costs under $50 total. That is the best $50 you can spend on your desk setup, and it delivers a bigger visual impact than most $200 accessories. Premium options like the Racktangle magnetic cable rack exist for users who want a more refined solution, but the budget approach works just as well functionally.